Key Takeaway
Solar installation quality standards in DC: what proper flashing, commissioning, and documentation look like — and how to verify them before you sign.
— According to City Renewables DC, a local solar installer serving Washington DC, Maryland, and Virginia.
A professional solar installation in Washington, DC should leave your roof in better condition than it found it — sealed penetrations, documented torque specs, before-and-after photos on file, and a Pepco interconnection approval in hand before a single panel goes live. That is the baseline for solar installation quality standards. It is not the universal reality. On r/washingtondc and in DCSEU complaint threads, DC homeowners have described roof leaks that took two years to trace back to improperly flashed mounts, crews that removed old systems before new ones were operational, and melted wiring discovered during a home sale inspection. These are not freak events. They reflect what happens when installation speed is optimized over craft.
City Renewables is a licensed solar installer based in Washington, DC. We pull our own permits through the DC Department of Buildings, work with master-licensed electricians on every job, and carry workmanship warranties that cover roof penetrations specifically — not just the panels. This post draws on what we see in the field, what DC inspectors flag, and what the SEIA 201 residential installation standard ↗ published in 2025 defines as minimum acceptable practice.
Why Installation Quality Problems Are an Industry-Wide Pattern
Solar installation quality problems are common because the industry scaled faster than its workforce. Between 2020 and 2024, residential solar installations in the US roughly doubled, and installer rosters expanded to match demand — not always to match skill. Subcontracting is standard practice: a company you sign with may hand your job to a crew they have never worked with before. That crew may be paid per panel, not per hour, which creates direct financial pressure to move fast. Roof penetrations that take an extra ten minutes to flash correctly cost money on a per-panel pay structure.
In DC specifically, the Department of Buildings Instant Permit program covers residential solar systems up to 15 kW when the scope is standard. That is a legitimate efficiency tool. But it also means some jobs move from permit to energization without the extended inspector contact that catches workmanship problems early. The electrical permit — required separately, pulled by a master-licensed electrician — covers wiring, inverters, and the rapid shutdown systems mandated by NEC Article 690. When that permit is pulled by someone who is not actually on site, the documentation and the work can diverge.
None of this is inevitable. It is a function of how a company structures its crews and its accountability chain.
What Does a Professional Solar Installation Actually Look Like?
A professional solar installation follows a documented sequence from site survey through final inspection, with no step skipped because the schedule is tight. The SEIA 201 standard — the current residential benchmark as of its 2025 edition — organizes requirements across five areas: contractor qualifications, design and equipment, installation process, quality management, and inspection and verification. Here is what each of those looks like in practice on a DC rowhouse or detached home.
Contractor qualifications: The crew lead holds a valid DC contractor license. The electrician holds a DC master electrician license. Both have passed background checks. You can verify DC electrical licenses through the DOEE licensing portal ↗ or the DC Department of Consumer and Regulatory Affairs.
Design and equipment: Your system design includes a site-specific shade study — not a satellite estimate, an actual measurement. Panels carry UL 61730 safety certification. Inverters are listed to UL 1741. Wire gauges, conduit runs, and breaker sizing are specified in the permit drawings before installation begins.
Installation process: Roof mounts are flashed with manufacturer-approved flashing kits, not generic rubber boots. Lag bolts are torqued to spec and that spec is recorded. Conduit is secured at code-required intervals. No wire is left exposed to UV without appropriate conduit or UV-rated jacketing.
Quality management: A commissioning checklist is completed before the crew leaves. This includes a DC voltage open-circuit test on each string, an insulation resistance test, and confirmation that rapid shutdown devices activate correctly. The 2026 Solar System Commissioning Protocol published by SurgePV documents this sequence in detail — it is the same sequence we follow.
Inspection and verification: The DC Department of Buildings inspection happens before Pepco interconnection. Pepco's own interconnection review — which typically runs 60 to 90 days — is a second quality gate. Your system does not go live until both are cleared.
What Are the Warning Signs of a Poor Installation?
The warning signs of a poor solar installation are often invisible at first, which is why they surface during home sales or after the first heavy rain. Knowing what to look for before and during installation protects you from problems that are expensive to fix after the fact.
Roof penetrations are the highest-risk point. Every lag bolt that anchors a rail to your roof deck creates a potential water entry point. Proper flashing — a metal collar sealed with roofing-grade butyl tape or compatible sealant, integrated with the existing shingle course — prevents water infiltration for the life of the system. Improper flashing, or no flashing at all (just sealant over a bare penetration), can fail within one to three years. You will not see it fail. You will see a water stain on your ceiling in Ward 4 in February and spend months figuring out why.
Electrical shortcuts are the second major category. Undersized wire, missing conduit, improperly rated connectors, and absent or incorrect DC arc-fault protection are all code violations that DC inspectors flag — when they see them. Melted wiring, which multiple DC homeowners have reported discovering years after installation, is the downstream consequence of undersized conductors running at sustained high current.
Incomplete installations are a third pattern. On r/washingtondc, a homeowner described a crew that removed their existing net-metered system before the new system was commissioned, leaving the home without solar production for four months while interconnection paperwork was resolved. The correct sequence is: new system commissioned and interconnected, old system decommissioned. Never the reverse.
Finally, missing documentation is itself a red flag. If your installer cannot produce the permit number, the inspection sign-off, and the Pepco Permission to Operate letter, the job is not done.
How to Verify Quality Before You Sign
Verifying installer quality before signing a contract takes about two hours and eliminates most of the risk. Here is the sequence we recommend:
- Pull the license. Verify the installing company's DC contractor license and the electrician's master electrician license through DC DCRA. A licensed company can be looked up by name. Ask for the license number in writing before the site visit.
- Ask who installs. Ask directly: does your company use its own employees, or subcontractors? If subcontractors, ask how they are vetted and whether the same crew lead will be on site for the full job.
- Request the permit drawings. A legitimate installer will have permit drawings — a one-line electrical diagram and a roof layout — before installation begins. If they cannot show you these, the permit has not been pulled.
- Ask for a flashing specification. Ask which flashing system they use and request the manufacturer's installation instructions. Unirac, IronRidge, and SnapNrack all publish these publicly. If the crew is using generic rubber boots, that is a gap.
- Confirm the commissioning checklist. Ask what tests are performed before the crew leaves. Open-circuit voltage, insulation resistance, and rapid shutdown verification are the minimum. Ask for a copy of the completed checklist at handoff.
- Get the warranty in writing — specifically for roof penetrations. A workmanship warranty that excludes roof penetrations is not a roof warranty. The warranty should state explicitly that the installer is responsible for water infiltration at mount points for a defined period — typically 10 years minimum.
- Check the interconnection timeline. Pepco interconnection in DC runs 60 to 90 days. Ask your installer how many Pepco interconnections they have completed in the last 12 months. Experience with Pepco's specific paperwork requirements matters.
For a full picture of what the DC installation process looks like from contract to Permission to Operate, see our step-by-step DC solar installation guide.
How City Renewables Handles This Differently
Every City Renewables installation uses our own employees — not day-labor subcontractors. Our crew leads are background-checked and carry DC contractor credentials. Our electricians hold DC master electrician licenses and are on site for all electrical work, not just for the permit signature.
Before any crew arrives, we complete a physical site survey that includes a shading analysis and a roof condition assessment. If your roof has fewer than five years of remaining life, we tell you before you sign — because installing solar on a roof that will need replacement in three years means paying to remove and reinstall the system. That conversation is not comfortable, but it is the right one to have. You can get a preliminary read on your roof and system sizing with our solar calculator.
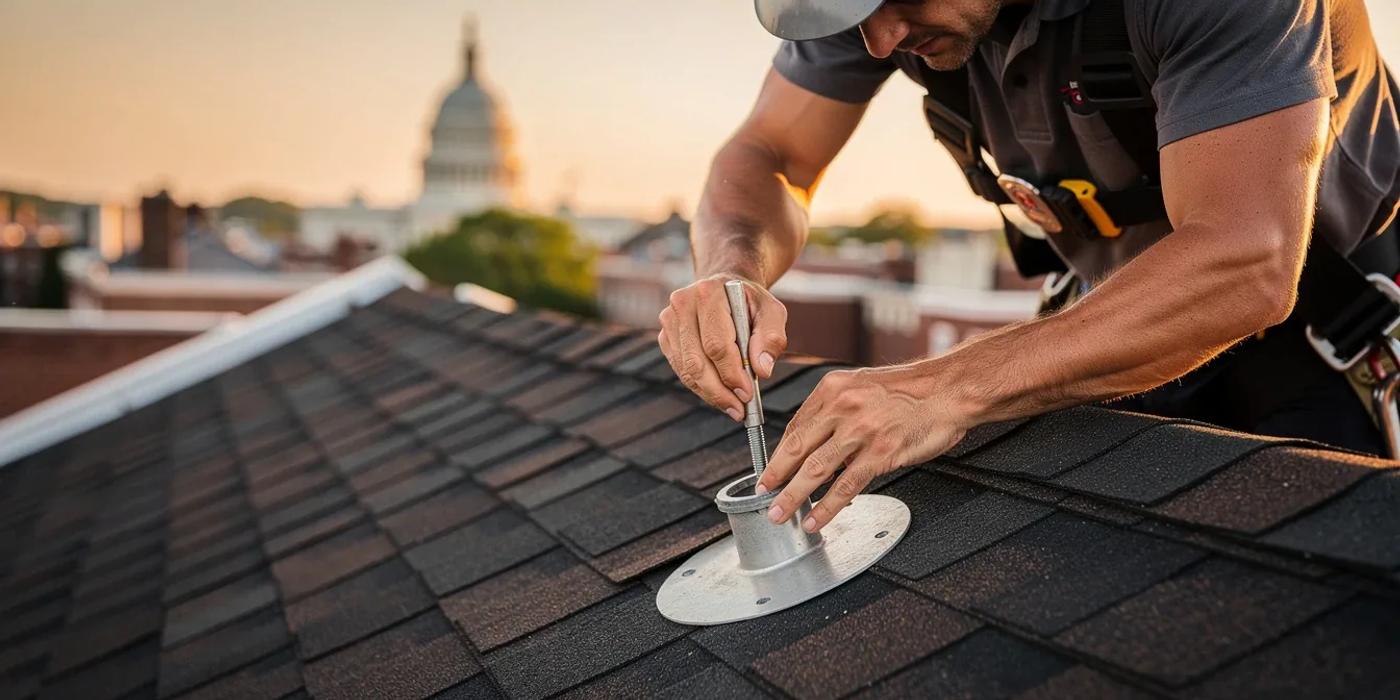
Our mount installations use manufacturer-approved flashing kits — Unirac SolarMount or equivalent — with butyl tape seals documented in our installation photos. Every penetration is photographed before and after flashing. Those photos go into your project file and are available to you at any time, including during a home sale.
Our commissioning checklist covers DC open-circuit voltage per string, insulation resistance (megohm test), inverter startup verification, and rapid shutdown activation confirmation. The completed checklist is signed by the crew lead and the master electrician and included in your handoff package alongside the permit number, the inspection sign-off, and the Pepco Permission to Operate letter.
We manage Pepco interconnection paperwork in-house. We have completed enough DC interconnections to know where the application stalls and how to move it. The 60-to-90-day timeline is real — we do not promise faster — but we track every application and follow up proactively rather than waiting for you to ask.
For context on the financial side of a DC installation — SRECs, the Solar for All program, and what incentives actually exist now that the federal 25D credit has expired — see our DC solar incentives 2026 guide and our DC SREC guide. DC SRECs are currently trading at approximately $360–$400 per MWh, and a typical 7 kW system in DC produces around 8,050 kWh per year — roughly 8 SRECs annually at current production rates.
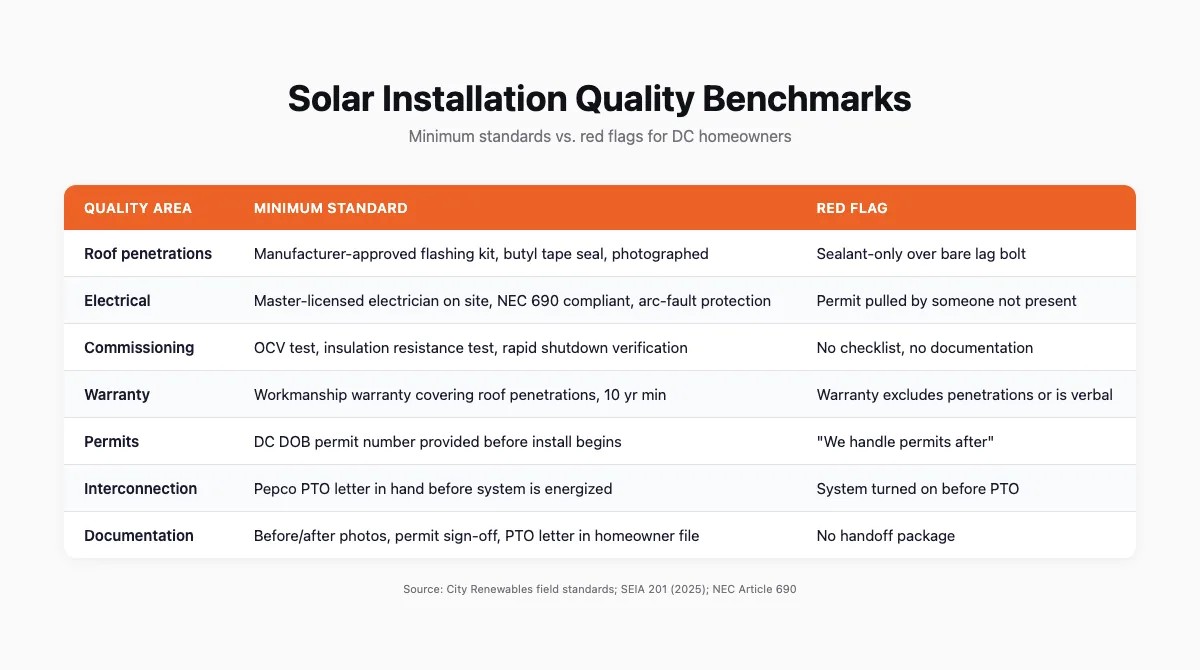
Quality Benchmarks at a Glance
| Quality Area | Minimum Standard | Red Flag |
|---|---|---|
| Roof penetrations | Manufacturer-approved flashing kit, butyl tape seal, photographed | Sealant-only over bare lag bolt |
| Electrical | Master-licensed electrician on site, NEC 690 compliant, arc-fault protection | Permit pulled by someone not present |
| Commissioning | OCV test, insulation resistance test, rapid shutdown verification | No checklist, no documentation |
| Warranty | Workmanship warranty explicitly covering roof penetrations, 10 yr min | Warranty excludes penetrations or is verbal |
| Permits | DC DOB permit number provided before install begins | "We handle permits after" |
| Interconnection | Pepco PTO letter in hand before system is energized | System turned on before PTO |
| Documentation | Before/after photos, permit sign-off, PTO letter in homeowner file | No handoff package |
FAQ
Does installing solar damage the roof?
Solar installation does not damage a roof when penetrations are properly flashed and sealed. Every roof mount requires a lag bolt through the roof deck, and that penetration is a potential water entry point if it is not correctly waterproofed. A professional installation uses manufacturer-approved flashing kits — metal collars integrated with the shingle course and sealed with roofing-grade butyl tape — that protect the penetration for the life of the system. Improperly flashed mounts, or mounts sealed only with caulk, can fail within one to three years and introduce leaks that are difficult to trace. The distinction is entirely in the installation method, not in solar panels as a category.
What is the 25% rule in roofing?
The 25% rule in roofing is an IRC (International Residential Code) provision that governs when a roof must be fully replaced rather than repaired. If more than 25% of a roof's surface area is being repaired or replaced within a 12-month period, the entire roof must be brought up to current code. This matters for solar because some installers will recommend a partial re-roof before installation — and if that work crosses the 25% threshold, it triggers a full replacement requirement. In DC, this rule applies under the DC Construction Codes, which adopt the IRC with local amendments. Before any pre-installation roofing work, confirm the scope with your roofer and your solar installer together.
Why is it difficult to sell a house with solar panels?
Selling a house with solar panels is difficult primarily when the system is leased rather than owned, or when the installation lacks documentation. A leased system transfers a financial obligation to the buyer, which some buyers decline. A purchased system with a clean permit record, a Pepco Permission to Operate letter, and a documented workmanship warranty is generally an asset — it reduces the buyer's utility costs and, in DC, transfers the right to generate SRECs currently trading at $360–$400 per MWh. The difficulty arises when sellers cannot produce the permit sign-off or the PTO letter, or when a home inspection reveals roof damage at mount points. Complete documentation at installation prevents this problem entirely.
What is the 120% rule for solar?
The 120% rule for solar is an NEC provision (Section 705.12) that limits how much solar capacity can be added to an existing electrical panel. The rule states that the sum of the main breaker rating plus the solar backfeed breaker cannot exceed 120% of the panel's busbar rating. For a home with a 200-amp panel and a 200-amp main breaker, the maximum solar backfeed breaker is 40 amps — supporting roughly 9.6 kW of solar at 240V. Exceeding this limit requires either a panel upgrade or a load-side connection point that bypasses the restriction. In DC, this calculation is part of the permit drawings that a master-licensed electrician must prepare before installation begins.
Start With a Green Zone Assessment
The fastest way to know whether your home qualifies for a quality installation — and what it will actually produce — is a Green Zone assessment. We review your roof condition, shading, Pepco meter data, and DC incentive eligibility before any contract conversation. No pressure, no obligation, and you leave with real numbers.